Lavalier microphones are one of the best ways to get high-quality audio in a variety of situations. They leave a speaker free to move around, use their hands and, in some cases, even sing and dance without needing to hold a microphone.
One thing that can be tricky to figure out when it comes to wearing a
That might sound simple enough, but what happens if the microphone gets obstructed by clothing? What happens if it keeps slipping or falling off during recording? Darting back and forth towards the person wearing the microphone to fix it will be frustrating for both you and the wearer, and you’ll run the risk of looking unprofessional.
To help you get it right every time, we’ve put together some useful advice. We’ll explain where to place the mic itself, but also what to do with the transmitter, cable, and everything else usually forgotten when it comes to hooking up a lavalier microphone.
Table of Contents
What Is A Lavalier Microphone?
Let’s start with the basics. A lavalier microphone is a small microphone that is usually clipped to a person’s clothing and is typically for use conducting interviews or hosting presentations. It allows the person to move naturally without the need to hold a microphone, and so it often leads to better, more natural responses than other types of microphones.
Their discrete size also makes lavalier microphones an excellent choice for anybody recording video using a DSLR camera and wanting the best audio possible to match the quality of the film.
Lavalier Microphone Placement
When recording vocals, the general rule is to try to get your microphone as close to the mouth as possible, so you pick up every word while minimizing background noise.
However, when you’re recording video, you want to be able to see what the person is saying as well as hearing them clearly. Placing a large microphone close to their mouth will pretty much cover a part of their face. Which can be confusing, and a nightmare for people who might rely on lipreading to be sure of the meaning of what’s said.
Here is where a lavalier microphone saves the day! Sensitive enough to pick up vocals while reducing background noise, a lavalier mic can be easily placed on the lapel of a suit or a blouse. There it will give you a high-quality sound recording without masking the wearer’s face.
Generally speaking, the best placement for a
Lavalier Microphones & Clothing
Most lavalier microphones come with a small clip for pinning the mic to the wearer’s clothing. However, not all clothing is the same by design, and depending on what the person is wearing, placing the microphone on them can be a little more complicated.
It’s not impossible, though! Let’s go through some of the most common articles of clothing that an interviewee might wear, and find out the best way of making sure their lavalier microphone stays securely fastened.
Blazers & Jackets
These are perhaps the easiest of all types of clothing to pin a lavalier microphone. Clip the receiver to the lapel of a jacket or blazer, then place the cable and transmitter in a pocket or clip them on a belt.
Ties
A lavalier microphone can also be pinned to a tie using the included clip. However, the cable must run along the back of the tie to remain hidden, and the transmitter should be clipped to the person’s belt or placed in their pocket.
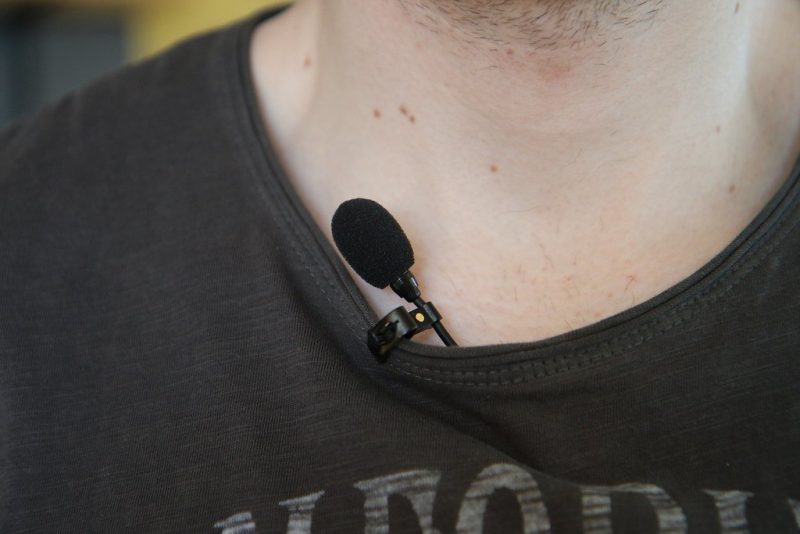
T-Shirts & Polo Shirts
Ask the person to run the microphone and cable up the inside of their t-shirt. Then clip the microphone to the center of their collar under the chin. Be sure that they don’t bring their head too far forward, though, otherwise they could end up hitting the microphone and disturbing the sound.
Dresses
Start by clipping the microphone to the collar of the dress. Then bring the cable and transmitter down the outside back of the dress. If the dress has a pocket or a belt that the transmitter can clip on, then use that. Otherwise, you may have to ask the wearer to hold the electronics.
That’s less than ideal – after all, one of the critical benefits of a lavalier microphone is freedom of movement and expression. Anyone with a handful of transmitter is less free to move and express themselves, so if an alternative solution is available, do your best to find it,
Wherever you place the microphone, make sure that it has open space around it, as hair brushing against it or jewelry knocking it will create distortion, that will ruin the sound. And, in all cases, the cable must be tucked away or hidden inside the person’s clothing at all times. It not only makes the microphone’s setup look neater, but it also prevents the microphone from being accidentally tugged off as the person moves or gesticulates.
Final Word
There is a lot of unseen skill that goes into placing a lavalier microphone correctly. While setting up a microphone may not be thought of as the hardest part of sound recording, it’s something that requires patience and knowledge to get right.
With lavalier microphones, the biggest placement challenges, without a doubt, come from the clothing worn by the person hooked up to the mic. To make life easier, it’s often a good idea to think ahead when it comes to microphone placement.
You can even go as far as asking your guest to wear something to which you know the microphone will stay securely attached. That should make placing the microphone a quick and easy experience for both you and the person wearing it.
